


 Online Users
Statistics
- Latest user:
SimSim
Joined - 3256 registered users
- 1366 comments
- 319 entries
- 3334097 pages loaded
RabiDB's discord server


Release 20.2 - Not happy with the sorter result? Manually select your Top 3 from your profile page!
Please register an account to join this small community.
We're not bad people at all!
Please give your support to poor Cocoa on top of the page... (The Register button)
Entry #171 - Tips and Tricks

Note: My experiences for this fight are from novice difficulty loop 2. You can do this fight on any difficulty/loop, but the fight length may differ greatly.
I've uploaded one of my old attempts in its entirety. I fail this run near the end, but it does showcase most of the fight and how to handle the various parts (although it gets very sloppy near the end). This attempt was also before I found out the Poisoned and
  Burn affect the achievement.
This was, without a doubt, the hardest dodge master achievement for me to get. The fight is incredibly long and her attack patterns are in general, more dangerous than other bosses. You also have to deal with both forms of Irisu for this achievement (the fight itself and then the endurance test after). For this, you will have a total of three hits you are allowed to take, for both forms. Unlike
  Noah, there is no auto-save in between forms, so you will have to do it all in one go.
I have attached an image of the badges I used for this fight - you can change these to whatever you please, but I have equipped the most offensive badges I could think of. Note that the Tough Skin badge is absolutely MANDATORY as Irisu has one attack where she inflicts you with a variety of unavoidable debuffs and getting Poisoned or Burn will immediately disqualify you from getting this achievement. Before going to Irisu, make sure you have the maximum amount of
  Rumi Donut you can hold, they will be very helpful for the fight. It is also recommended (but not required) that you defeat the three SP bosses on your file to bring the maximum amount of
  Mana Up,
  Regen Up, and
  Attack Up in the shop to 21 (with a total max of 46, 36, and 41 respectively) [loop 2 values].
  Health Up is of course, not important.
As with all dodge master achievements, you will want as many buffs as you can get, to make the fight easier and shorter. Pick up all the 330 duration buffs from Miru and then rush over to Irisu. Unlike any other boss, there is no warp gate anywhere near Irisu. You will have to get through the library as quickly as you can. You should reach Irisu with 200-230 duration left on your buffs. After reaching her and getting the auto-save point in front of the battle, you can go one screen to the right and continuously die to the magic crystal enemies until you get
  Halo Boost Lv.3 to 900 duration. You are now ready to begin the fight.
The standard combo I use for this fight (and all fights) is to Combo V (using Erina Badge) until you are at about 10% SP, then hammer drill upwards, hammer drill downwards, and hammer drill upwards once again. This gives you the greatest duration of attack while also keeping damage up since the damage from Combo V greatly decreases over time.
At the beginning of the fight, you have a few seconds beforeIrisu will do anything, so you should make use of them. Start with max boost attack from  Ribbon using the blue starting shot and then walk over to Irisu and do your combo (I found simply walking up to her more damaging then using
  Bunny Strike because Bunny Strike will start her invincibility earlier and not let you finish your combo. You should be able to finish your combo and also use
  Super Carrot once before the dialogue hits. After Irisu speaks and starts her ultimate, instead of walking away, you will want to stay near her. She will then inflict
  No Badges,
  Boost Fail, and
 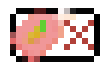 Amulet Drain on you. Obviously, you will want to avoid all three of these, but instead of using three amulet charges, you can deal more damage by using one amulet charge, one Super Carrot, a second amulet charge, and a second Super Carrot before she moves. She will then do her divebomb attack. You will want to dodge this attack by going to the right (not the left) because the explosion lingers on her left side and you can walk up to her and initiate another combo (although you won't finish it). Once Irisu goes off screen, if Ribbon is still doing her boost attack, you can cancel it by clicking the boost button again so she starts regaining MP quicker.
The secondIrisu starts descending onto the screen, you can land 2-3 charged blue shots before she starts attacking. After that, I use the  Chaos Rod uncharged attack to continually attack her while dodging the beams. You can use any weapon you want, but I feel the Chaos Rod is the safest choice because it will hit Irisu no matter where she is. Immediately after she finishes her attack and starts to land, use another max boost attack from Ribbon and start comboing her before she lands - this ensures she will not have the opportunity to start an attack and she will not have any invincibility until after you finish your combo. She will then initiate her star attack that transitions into a beam attack. If you have not practiced Irisu already, this may take a bit of time to learn how to position so that none of the beams will hit you. The stars will roughly track
  Erina and leave orbs behind in their path, where the beams will spawn. Once the beams start going, position Erina safely so that she doesn't give hit and attack Irisu either with a standard hammer combo if she is in a safe spot, with
  Hammer Wave if she is far away and Ribbon is still doing her boost attack, or with charged blue shots.
This is where the fight will start to differ depending on how much damage you did.Irisu has four phases that start when she reaches certain thresholds of HP. The faster you damage her, the faster she transitions phases, and the more attacks she skips. Phase 1 is when you enter the battle, phase 2 is at around 2/3 HP, phase 3 is at around 1/3 HP, and phase 4 is when she reaches 1 HP and goes into  Endurance mode.
The fight will look something like this:
Phase 1:
Phase 2:
Phase 3:
During phase 3, whenever you hitIrisu, you will receive the  Instant Death debuff. This should mostly be ignorable because you're already trying to get dodge master, but if you're having trouble with it, you can consider equipping the
  Survival badge (since you have three total hits allowed). At some point, Irisu will start putting her debuffs onto you, this will also drain your amulet charges down to below two (because
  Auto Trigger will try to counter them). When she is done, this is the best time to use all of your Rumi Donut because you'll be low on charges and the next attacks can be somewhat tricky to dodge.
After defeatingIrisu's first form you'll proceed onto the Endurance section as normal. There should be nothing notable about this section, just be careful and try not to get hit here, since you're already in the home stretch.
My goals for the fight were entering phase 3 taking 0 hits and entering phase 4 taking a maximum of 2 hits.
I've uploaded one of my old attempts in its entirety. I fail this run near the end, but it does showcase most of the fight and how to handle the various parts (although it gets very sloppy near the end). This attempt was also before I found out the
Poisoned and Burn affect the achievement.
This was, without a doubt, the hardest dodge master achievement for me to get. The fight is incredibly long and her attack patterns are in general, more dangerous than other bosses. You also have to deal with both forms of
Irisu for this achievement (the fight itself and then the endurance test after). For this, you will have a total of three hits you are allowed to take, for both forms. Unlike Noah, there is no auto-save in between forms, so you will have to do it all in one go.
I have attached an image of the badges I used for this fight - you can change these to whatever you please, but I have equipped the most offensive badges I could think of. Note that the
Tough Skin badge is absolutely MANDATORY as Irisu has one attack where she inflicts you with a variety of unavoidable debuffs and getting Poisoned or Burn will immediately disqualify you from getting this achievement. Before going to Irisu, make sure you have the maximum amount of Rumi Donut you can hold, they will be very helpful for the fight. It is also recommended (but not required) that you defeat the three SP bosses on your file to bring the maximum amount of Mana Up, Regen Up, and Attack Up in the shop to 21 (with a total max of 46, 36, and 41 respectively) [loop 2 values]. Health Up is of course, not important.
As with all dodge master achievements, you will want as many buffs as you can get, to make the fight easier and shorter. Pick up all the 330 duration buffs from
Miru and then rush over to Irisu. Unlike any other boss, there is no warp gate anywhere near Irisu. You will have to get through the library as quickly as you can. You should reach Irisu with 200-230 duration left on your buffs. After reaching her and getting the auto-save point in front of the battle, you can go one screen to the right and continuously die to the magic crystal enemies until you get Halo Boost Lv.3 to 900 duration. You are now ready to begin the fight.
The standard combo I use for this fight (and all fights) is to Combo V (using
At the beginning of the fight, you have a few seconds before
Irisu will do anything, so you should make use of them. Start with max boost attack from Ribbon using the blue starting shot and then walk over to Irisu and do your combo (I found simply walking up to her more damaging then using Bunny Strike because Bunny Strike will start her invincibility earlier and not let you finish your combo. You should be able to finish your combo and also use Super Carrot once before the dialogue hits. After Irisu speaks and starts her ultimate, instead of walking away, you will want to stay near her. She will then inflict No Badges, Boost Fail, and Amulet Drain on you. Obviously, you will want to avoid all three of these, but instead of using three amulet charges, you can deal more damage by using one amulet charge, one Super Carrot, a second amulet charge, and a second Super Carrot before she moves. She will then do her divebomb attack. You will want to dodge this attack by going to the right (not the left) because the explosion lingers on her left side and you can walk up to her and initiate another combo (although you won't finish it). Once Irisu goes off screen, if Ribbon is still doing her boost attack, you can cancel it by clicking the boost button again so she starts regaining MP quicker.
The second
Irisu starts descending onto the screen, you can land 2-3 charged blue shots before she starts attacking. After that, I use the Chaos Rod uncharged attack to continually attack her while dodging the beams. You can use any weapon you want, but I feel the Chaos Rod is the safest choice because it will hit Irisu no matter where she is. Immediately after she finishes her attack and starts to land, use another max boost attack from Ribbon and start comboing her before she lands - this ensures she will not have the opportunity to start an attack and she will not have any invincibility until after you finish your combo. She will then initiate her star attack that transitions into a beam attack. If you have not practiced Irisu already, this may take a bit of time to learn how to position so that none of the beams will hit you. The stars will roughly track Erina and leave orbs behind in their path, where the beams will spawn. Once the beams start going, position Erina safely so that she doesn't give hit and attack Irisu either with a standard hammer combo if she is in a safe spot, with Hammer Wave if she is far away and Ribbon is still doing her boost attack, or with charged blue shots.
This is where the fight will start to differ depending on how much damage you did.
Irisu has four phases that start when she reaches certain thresholds of HP. The faster you damage her, the faster she transitions phases, and the more attacks she skips. Phase 1 is when you enter the battle, phase 2 is at around 2/3 HP, phase 3 is at around 1/3 HP, and phase 4 is when she reaches 1 HP and goes into Endurance mode.
The fight will look something like this:
Phase 1:
- Irisu uses her ultimate
- Divebomb attack
- Star attack from left and right
- Spinning laser attack in the air
- Star attack leading into lasers
- Exploding ball/spread attack (Note: you can skip this attack and onward if you can deal enough damage)
- Spinning laser attack in the air
- Laser attack
Phase 2:
- Square walls from left and right
- Lasers that you dodge with
 Sliding Powder and
  Air Dash
 - 10 sided bubble spread while in the air (you can still attack with Chaos Rod or any other weapon you feel is safe)
- Three divebomb attacks followed by lasers originating from them (you can attack either with Ribbon or with hammer up to Combo IV if you're quick)
- Bubble attack originating from Irisu (get away from her quickly after she finishes her last divebomb)
- Star attack originating from Irisu while in the air (you can still attack with Chaos Rod or any other weapon you feel is safe)
 Cicini's laser attack that follows you around (Note: you can skip this attack and onward if you can deal enough damage)
- Laser spread that dives onto you
Phase 3:
- Square walls from the top and bottom
- X shaped laser (you can dodge this by standing at the very left or right of the map and the beam will pass over you)
- Irisu summons her clones
- Bubble attack originating from Irisu (get away from her after you kill all her clones)
- Laser spread attack
- Red/blue/green lasers
- Debuff attack (Tough Skin is mandatory here, also the best time to use Rumi Donut)
- Star laser attack
- Full screen shot spread attack
- Giant blue bomb that tracks you (Note: you can skip this attack and onward if you can deal enough damage)
- Laser attack dodged by Air Dash
- Miru's twisting ball attack with extra waves of balls
- Bubble attack originating from Irisu
During phase 3, whenever you hit
Irisu, you will receive the Instant Death debuff. This should mostly be ignorable because you're already trying to get dodge master, but if you're having trouble with it, you can consider equipping the Survival badge (since you have three total hits allowed). At some point, Irisu will start putting her debuffs onto you, this will also drain your amulet charges down to below two (because Auto Trigger will try to counter them). When she is done, this is the best time to use all of your Rumi Donut because you'll be low on charges and the next attacks can be somewhat tricky to dodge.
After defeating
Irisu's first form you'll proceed onto the Endurance section as normal. There should be nothing notable about this section, just be careful and try not to get hit here, since you're already in the home stretch.
My goals for the fight were entering phase 3 taking 0 hits and entering phase 4 taking a maximum of 2 hits.
Posted
This entry has been attached to the following objects
This entry has received the following edits
This entry contains the following Media elements
This entry has been liked by the following users