


Statistics
- Latest user:
Marioguy122
Joined - 3257 registered users
- 1366 comments
- 319 entries
- 3337324 pages loaded
RabiDB's discord server


Release 20.2 - Not happy with the sorter result? Manually select your Top 3 from your profile page!
Please register an account to join this small community.
We're not bad people at all!
Please give your support to poor Cocoa on top of the page... (The Register button)
Entry #172 - High Risk, High Reward

Note: My experiences from this fight are from novice loop 2. Your fight may differ greatly depending on difficulty and loop.
I have uploaded a zero hit run in its entirety. I would say it went about as optimally as possible and had the fastest klll I've ever done (just under 2 minutes).
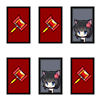
I have uploaded an image of the badges I had equipped. These badges were chosen for maximum damage potential; you can change them around, but beware of Miriam's
  Badge Copy (you can check the Badge Copy page for more information). Note that you absolutely do not want to equip
  Pure Love for this fight because it will give Miriam
  Bunny Lover, which would half damage done to her, so be very careful about taking collision damage.
  Mana Plus,
  Mana Surge, and
  Health Wager will give Miriam
  MaxMP Up which says it will increase her attack frequency, but I haven't found this effect to be noticeable and the extra MP on
  Ribbon will help greatly. Note that for the achievement you are technically allowed to be hit a maximum of two times; however, for this strategy, a single collision or hit without
  Auto Trigger will kill you, so take note of that.
As for all dodge masters, you will want to start by purchasing all the 330 duration buffs from Miru. Unlike the other post-game dodge masters,
  Halo Boost Lv.3 should be completely unnecessary here, you can get it if you want, but you shouldn't need it (I only have it on in the video because it was the same save I was using to prep for
  Rumi. I used a total of three manual amulet charges and had Auto Trigger go off once. You will also want to equip
  Survival before the fight, drop down to one HP and then unequip it for
  Crisis Boost and the
  Carrot Shooter. The Carrot Shooter is highly recommended for this fight for multiple reasons which can be seen in the video or explained below. Finally, make sure Ribbon is at max BP because you will be starting the fight off with a max boost. Once all that is complete, you are ready to start the fight.
The main idea for this fight is, you want to do everything in your power to deal as much damage as you possibly can, as fast as you possibly can. This is becauseMiriam has a huge array of deadly attacks, but it is very possible to kill her before she is able to unleash a single one.
Miriam will start the fight by attempting to move to the left side of the screen. What you should do is immediately jump slightly behind her and activate Ribbon's max boost with the Carrot Shooter and then proceed to Combo V/hammer drill Miriam while facing right. The goal here is to push Miriam slightly rightward and into Ribbon's boost attack. Once your combo is complete, use a quick  Super Carrot and then quickly run or
  Air Dash to the left to get into position for Miriam's first attack.
Miriam's first item is the 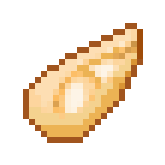 Quick Barrette. For this attack, she will fire charged blue shots at you in a set pattern. This pattern is always the same, so once you memorized it, you should be able to dodge it easily. The general idea is to jump in place for the first shot, and then jump forward and land in the middle of the arena and walk back and repeat for every shot after that. On your fourth jump forward, instead of going back, proceed to attacking Miriam again as her attack should have ended by now. This should also coincide with Ribbon's max boost attack finishing (assuming you didn't have Auto Trigger go off and drain your MP). If you really have trouble with this attack, you can also skip it entirely by floating in the air with the item method. After a combo or so, Miriam will start walking to the left, which leaves her at her greatest vulnerability. While she is walking, you should stand to her left and either charge up the Carrot Shooter or use hammer drills on her - this will stagger her slightly and interrupt her movement, but she will keep attempting to move without attacking until she has either made it to the other side or a certain amount of time has elapsed (this is mostly based on experience, you'll find out how long you can afford to interrupt her after a few tries). The Carrot Shooter is especially good here because after its main shot, it will drop three carrot bombs that Miriam will walk into. Once she has made it the other side, she will begin her second attack.
Miriam's second item is the  Carrot Bomb. This attack is incredibly easy to dodge, so you can simply fire charged shots at her for the duration of the attack. Try to get your rank from B/A up to SSS/MAX during this time. Immediately after she is done this attack, she will switch to the
  Explode Shot without moving. This is your chance to dash next to her, use another max boost from Ribbon and proceed to hammer away at her. If you are at the very left of the screen, none of the circles should touch you, so you are safe to attack. Switch between Combo V and hammer drills so that Combo V's damage doesn't fall off too much. Use Super Carrot whenever the "cooldown" wears off. After this attack, Miriam will once again try to move to the right, get as much free damage off here as you can.
Miriam's fourth item is the  Book of Carrot. She will unleash two "amulet charges" at you. Counter these with your own
  Bunny Amulet. You should anticipate these and manually use the Bunny Amulet so that each use costs 0.75 (with
 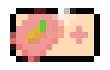 Amulet Cut) charges instead of 2. Her next item is the
  Piko Hammer. This will cause a huge explosion and it will rain down bullets, as well as shoot three walls at you. This can be avoided with practice and good timing, or one to two Bunny Amulet charges. This is where I ended the fight, but I will describe the next few attacks just in case.
Miriam's sixth item is the  Hammer Wave. This will cause a lot of hammer waves to spawn at the top of the map and home in on you. These are pretty easily dodged, so you should be able to just move around while continually shooting her with Ribbon's Carrot Shooter. The next attack is much more dangerous, so hopefully you can end the fight here. Her next item is the
  Charge Ring which causes her to continually barrage you with charged shots from Ribbon's various weapons. I don't have any advice for this specific attack on dodge master or for any items beyond this as I've always killed her faster than this.
I have uploaded a zero hit run in its entirety. I would say it went about as optimally as possible and had the fastest klll I've ever done (just under 2 minutes).
I have uploaded an image of the badges I had equipped. These badges were chosen for maximum damage potential; you can change them around, but beware of
Miriam's Pure Love for this fight because it will give Miriam Bunny Lover, which would half damage done to her, so be very careful about taking collision damage. Mana Plus, Mana Surge, and Health Wager will give Miriam MaxMP Up which says it will increase her attack frequency, but I haven't found this effect to be noticeable and the extra MP on Ribbon will help greatly. Note that for the achievement you are technically allowed to be hit a maximum of two times; however, for this strategy, a single collision or hit without Auto Trigger will kill you, so take note of that.
As for all dodge masters, you will want to start by purchasing all the 330 duration buffs from
Miru. Unlike the other post-game dodge masters, Halo Boost Lv.3 should be completely unnecessary here, you can get it if you want, but you shouldn't need it (I only have it on in the video because it was the same save I was using to prep for Rumi. I used a total of three manual amulet charges and had Auto Trigger go off once. You will also want to equip Survival before the fight, drop down to one HP and then unequip it for Crisis Boost and the Carrot Shooter. The Carrot Shooter is highly recommended for this fight for multiple reasons which can be seen in the video or explained below. Finally, make sure Ribbon is at max BP because you will be starting the fight off with a max boost. Once all that is complete, you are ready to start the fight.
The main idea for this fight is, you want to do everything in your power to deal as much damage as you possibly can, as fast as you possibly can. This is because
Miriam has a huge array of deadly attacks, but it is very possible to kill her before she is able to unleash a single one.
Miriam will start the fight by attempting to move to the left side of the screen. What you should do is immediately jump slightly behind her and activate Ribbon's max boost with the Carrot Shooter and then proceed to Combo V/hammer drill Miriam while facing right. The goal here is to push Miriam slightly rightward and into Ribbon's boost attack. Once your combo is complete, use a quick Super Carrot and then quickly run or Air Dash to the left to get into position for Miriam's first attack.
Miriam's first item is the Quick Barrette. For this attack, she will fire charged blue shots at you in a set pattern. This pattern is always the same, so once you memorized it, you should be able to dodge it easily. The general idea is to jump in place for the first shot, and then jump forward and land in the middle of the arena and walk back and repeat for every shot after that. On your fourth jump forward, instead of going back, proceed to attacking Miriam again as her attack should have ended by now. This should also coincide with Ribbon's max boost attack finishing (assuming you didn't have Auto Trigger go off and drain your MP). If you really have trouble with this attack, you can also skip it entirely by floating in the air with the item method. After a combo or so, Miriam will start walking to the left, which leaves her at her greatest vulnerability. While she is walking, you should stand to her left and either charge up the Carrot Shooter or use hammer drills on her - this will stagger her slightly and interrupt her movement, but she will keep attempting to move without attacking until she has either made it to the other side or a certain amount of time has elapsed (this is mostly based on experience, you'll find out how long you can afford to interrupt her after a few tries). The Carrot Shooter is especially good here because after its main shot, it will drop three carrot bombs that Miriam will walk into. Once she has made it the other side, she will begin her second attack.
Miriam's second item is the Carrot Bomb. This attack is incredibly easy to dodge, so you can simply fire charged shots at her for the duration of the attack. Try to get your rank from B/A up to SSS/MAX during this time. Immediately after she is done this attack, she will switch to the Explode Shot without moving. This is your chance to dash next to her, use another max boost from Ribbon and proceed to hammer away at her. If you are at the very left of the screen, none of the circles should touch you, so you are safe to attack. Switch between Combo V and hammer drills so that Combo V's damage doesn't fall off too much. Use Super Carrot whenever the "cooldown" wears off. After this attack, Miriam will once again try to move to the right, get as much free damage off here as you can.
Miriam's fourth item is the Book of Carrot. She will unleash two "amulet charges" at you. Counter these with your own Bunny Amulet. You should anticipate these and manually use the Bunny Amulet so that each use costs 0.75 (with Amulet Cut) charges instead of 2. Her next item is the Piko Hammer. This will cause a huge explosion and it will rain down bullets, as well as shoot three walls at you. This can be avoided with practice and good timing, or one to two Bunny Amulet charges. This is where I ended the fight, but I will describe the next few attacks just in case.
Miriam's sixth item is the Hammer Wave. This will cause a lot of hammer waves to spawn at the top of the map and home in on you. These are pretty easily dodged, so you should be able to just move around while continually shooting her with Ribbon's Carrot Shooter. The next attack is much more dangerous, so hopefully you can end the fight here. Her next item is the Charge Ring which causes her to continually barrage you with charged shots from Ribbon's various weapons. I don't have any advice for this specific attack on dodge master or for any items beyond this as I've always killed her faster than this.
Posted
This entry has been attached to the following objects
This entry has received the following edits
This entry contains the following Media elements
This entry has been liked by the following users